Projection of Lines
In this post, we'll practice a question on the Projection of Lines in Engineering Graphics. The projection of lines is one of the most important topics from an exam perspective. The question is as follows:
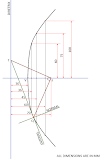
Question: The elevation of line AB, 80 mm long, measures 55 mm. The end A is 20 mm above H.P. and 10 mm in front of V.P. Draw the projections of the line and find its true inclinations with H.P. and V.P. If the end B is 25 mm below H.P. and is behind V.P.
Given data:
- TL = 80 mm
- FVL = 55 mm
- a' = 20 mm above HP
- a = 10 mm in front of the VP
- b' = 25 mm below HP
Solution:
Procedure:
- Project the given points (a' and a) according to the question (Don't know the concept of Projection of Points? Don't worry click here to learn!) and draw the respective locus of the points.
- To project the point b', we have to draw a horizontal line (which will be the locus of b') 25 mm below the X-Y line. With the help of FVL (Front View Length) given in the question, we can project point b'.
- Take a compass and measure 55 mm(= 5.5 cm) with the help of a scale. Now taking the center as the point a' draw an arc on the locus of b'. Which will be the point b'.
- Connect the points a' and b' which is the front view of the line AB.
- Now, for the true length, take a compass and measure 80 mm(= 8 cm) with the help of a scale. Now taking the center as the point a' draw an arc on the locus of b'. Which will be the point b₁'.
- Connect the points a' and b₁' which is the true length of the line AB.
- Now, to draw the top view of line AB draw a vertical line from point b₁' to the locus of a. Where the vertical line and locus of a intersects, name that point as g.
- Now, take a compass and measure the distance ag and taking center as the point a, draw an arc from the point g to the upper side of the line X-Y (As long as it seems to be required according to you).
- Draw a vertical line from the point b' to the arc which you drew in the previous step. Where they intersect, name that point b and draw the locus of b.
- Connect points a and b which is the top view of line AB.
- Now, for the true length, take a compass and measure 80 mm(= 8 cm) with the help of a scale. Now take the center as point a and draw an arc on the locus of b. Which will be the point b₁.
- Connect the points a and b₁ which is the true length of the line AB.
- At last, measure all the lengths and angles of the lines which should be equal to the given below:
- 𝛂 = 55°
- 𝛃 = 62°
- 𝝷 = 35°
- 𝞍 = 46°
- TVL = 65 mm
I hope you understood the solution very well. If you have any doubts regarding the solution or the question, let me know in the comment section. Till then keep learning, and keep improving!
Similar Questions:
- A straight line AB is 60 mm long. It is inclined to H.P. and V.P. by an angle of 30° and 45° respectively. Point A is 30 mm above H.P. and 20 mm in front of V.P. Draw the projections of straight line AB. Find also the traces.
- Find M of a line MN, which is inclined at 46° to H.P. and 20° to V.P. is 15 mm above the H.P. and it is in front of the V.P., while the end N is 60 mm in front of V.P. and is above H.P. Draw the projections of the line, find its true length if its plan length is 70 mm. Locate the points of intersection of the line with the principal planes.
- Draw the projections of the following points on the same x-y line. 1) Point A on V.P. and 30 mm below H.P. 2) Point B on H.P. and 20 mm in front of V.P. 3) Point C 20 mm above H.P. and 20 mm behind V.P. 4) Point D 25 mm below H.P. and 40 mm behind V.P. 5) Point E on H.P. and on V.P. 6) Point F 40 mm above H.P. and 10 mm in front of V.P. 7) Point G on V.P. and 35 mm above H.P.


.webp)
.webp)
0 Comments